
Google Shopping ads help you reach a broader audience and attract potential consumers. It can improve traffic and sales by displaying your products on the world’s most significant search engine. Take your business to the next level with Mega Digital’s complete guide to thoroughly understand what Google Shopping ads are and how it works.
Quick summary:
- Understand what Google Shopping Ads are and how they display product images, prices, and store details directly on Google search results.
- Learn how Shopping Ads work through Google Merchant Center product feeds instead of traditional keyword targeting.
- Discover key benchmarks such as CPC, CTR, and typical budget expectations to evaluate campaign performance.
- Explore step-by-step guidance to set up and optimize Shopping Ads campaigns to increase product visibility, traffic, and sales.
What is Google Shopping ads?
Google Shopping advertising, one of Google Ads’ campaign types, displays when people search for a product on Google. This is an illustration of Shopping ads when someone searches for “beginner surfboard”:
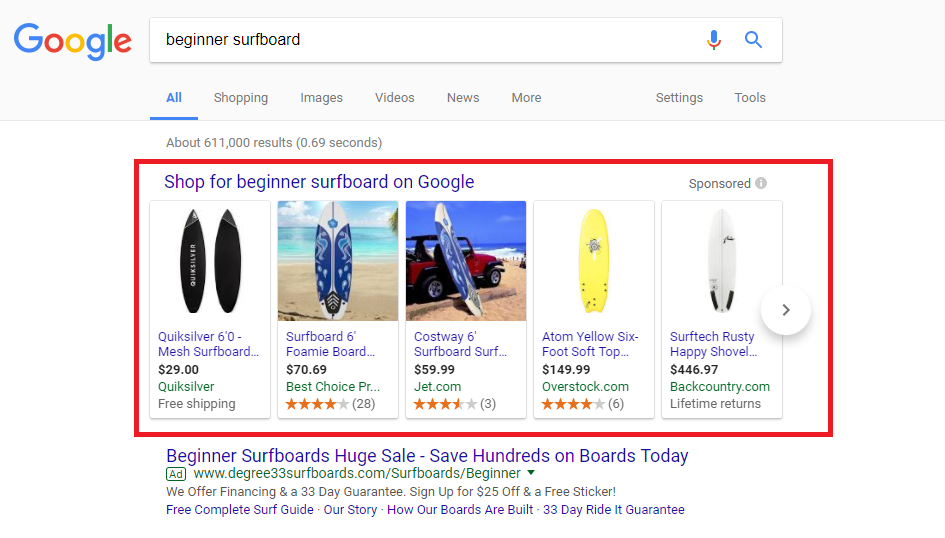
As you can see, Shopping ads will appear at the top of the Search Engine Results Page (SERP) as a sort product carousel, where searchers are most likely to look. These advertisements are powerful because they clearly show the product’s image, price, store name, and reviews.
In general, Google Shopping ads inform customers of the product’s essential details before they enter an online store.
How does Google Shopping ads work?
Google Ads and Google Merchant Center (GMC) are the two systems in charge of these advertisements. Shopping ads choose how to advertise on Google Shopping and where to display your ads based on your existing Google Merchant Center product data rather than keywords. The information you provide about the products you sell is in the product data you upload via GMC. When we match a user’s search to your advertising, we’ll use these specifics to display the most related products.
Google uses a cost-per-click (CPC) approach for their Shopping ads products, which implies that they only have to pay the “bid” when a customer clicks on their advertisement.
Remarkable benefits of Google Shopping ads
Investing in Google Shopping campaigns offers unique advantages that can transform your e-commerce revenue. Here are the top three benefits you should know:
- Maximize Visibility in Search Results: Google Shopping Ads appear at the top of Google SERPs, often above both text ads and organic listings, helping your products capture more attention and clicks.
- Showcase Products with Rich Details: Display product images, prices, ratings, and key information directly in the ad, allowing shoppers to evaluate products before clicking.
- Drive Higher-Intent Traffic: Users already see the product and its price before visiting your website, making them more likely to convert than general search traffic.
How much does Google Shopping ads cost?
Understanding the financial benchmarks of Shopping ads will help you allocate your budget effectively and measure your campaign’s success against industry standards.
Average cost of Google Shopping ads
A few key metrics for Google Shopping ads that all advertisers and marketers must know (based on reliable industry benchmarks from WordStream and recent data updates):
- Average CPC: $0.66 (ranging up to $0.79 depending on the niche), frequently producing extraordinary profit margins for several e-commerce brands.
- Average CTR: 0.86%
- Average CR (Conversion Rate): 1.91%
- Average CPA (Cost per Action): $38.87
- Average monthly budget: $770.41, even though it varies significantly by industry.
Google Shopping ads do not have a minimum bid or a minimum cost. There is no minimum daily budget, and you may set a cost per click as low as $0.01, so you have a lot of freedom in how much you spend on Google Shopping. Depending on how much promotion you want for your products, Google Shopping can cost you $1 per day, $1 per month, or more than $100 per day. Here are a few things to keep in mind:
- If your Google Shopping bids are too low, your ad visibility will also be low.
- Google will cease delivering your adverts if your Google Shopping daily budget is reached.
- The number of your products will also significantly impact the price of your Google Shopping campaign.
How to set up Google Shopping ads
Launching your first campaign requires connecting two platforms: Google Merchant Center for your product data and Google Ads for your campaign settings. Follow this step-by-step walkthrough to get started.
Step 1: Set up Google Merchant Center
Create an account
- The first step is to create a GMC account.
- Google will ask whether you sell products online and your store’s URL.
- Fill in your business name, business country, and time zone.
- If you use Shopify or Paypal, select now, or you can connect these later.
- Lastly, read and accept the Google Merchant Terms of Service.
Create and upload your data feed
Your product feed shows Google all about your products. The Google Shopping feed is necessary because it lets Google discover and show your products when users enter specific product phrases.
- First, go to your GMC account and find Products > Feeds to create a new data feed.
- Fill in your country and language. This determines which location will see your products.
- Next, name your product feed and decide how to enter the details of your products.
- If you select Google Sheets, you can use a template given by GMC or upload your own spreadsheet. Click here to check the complete list of Google’s product data specifications.
- Once finished, upload the file to Google Merchant Center.
- From that point on, go to Products > Feeds > Main feeds on your Google Merchant Center account to access your product feed.
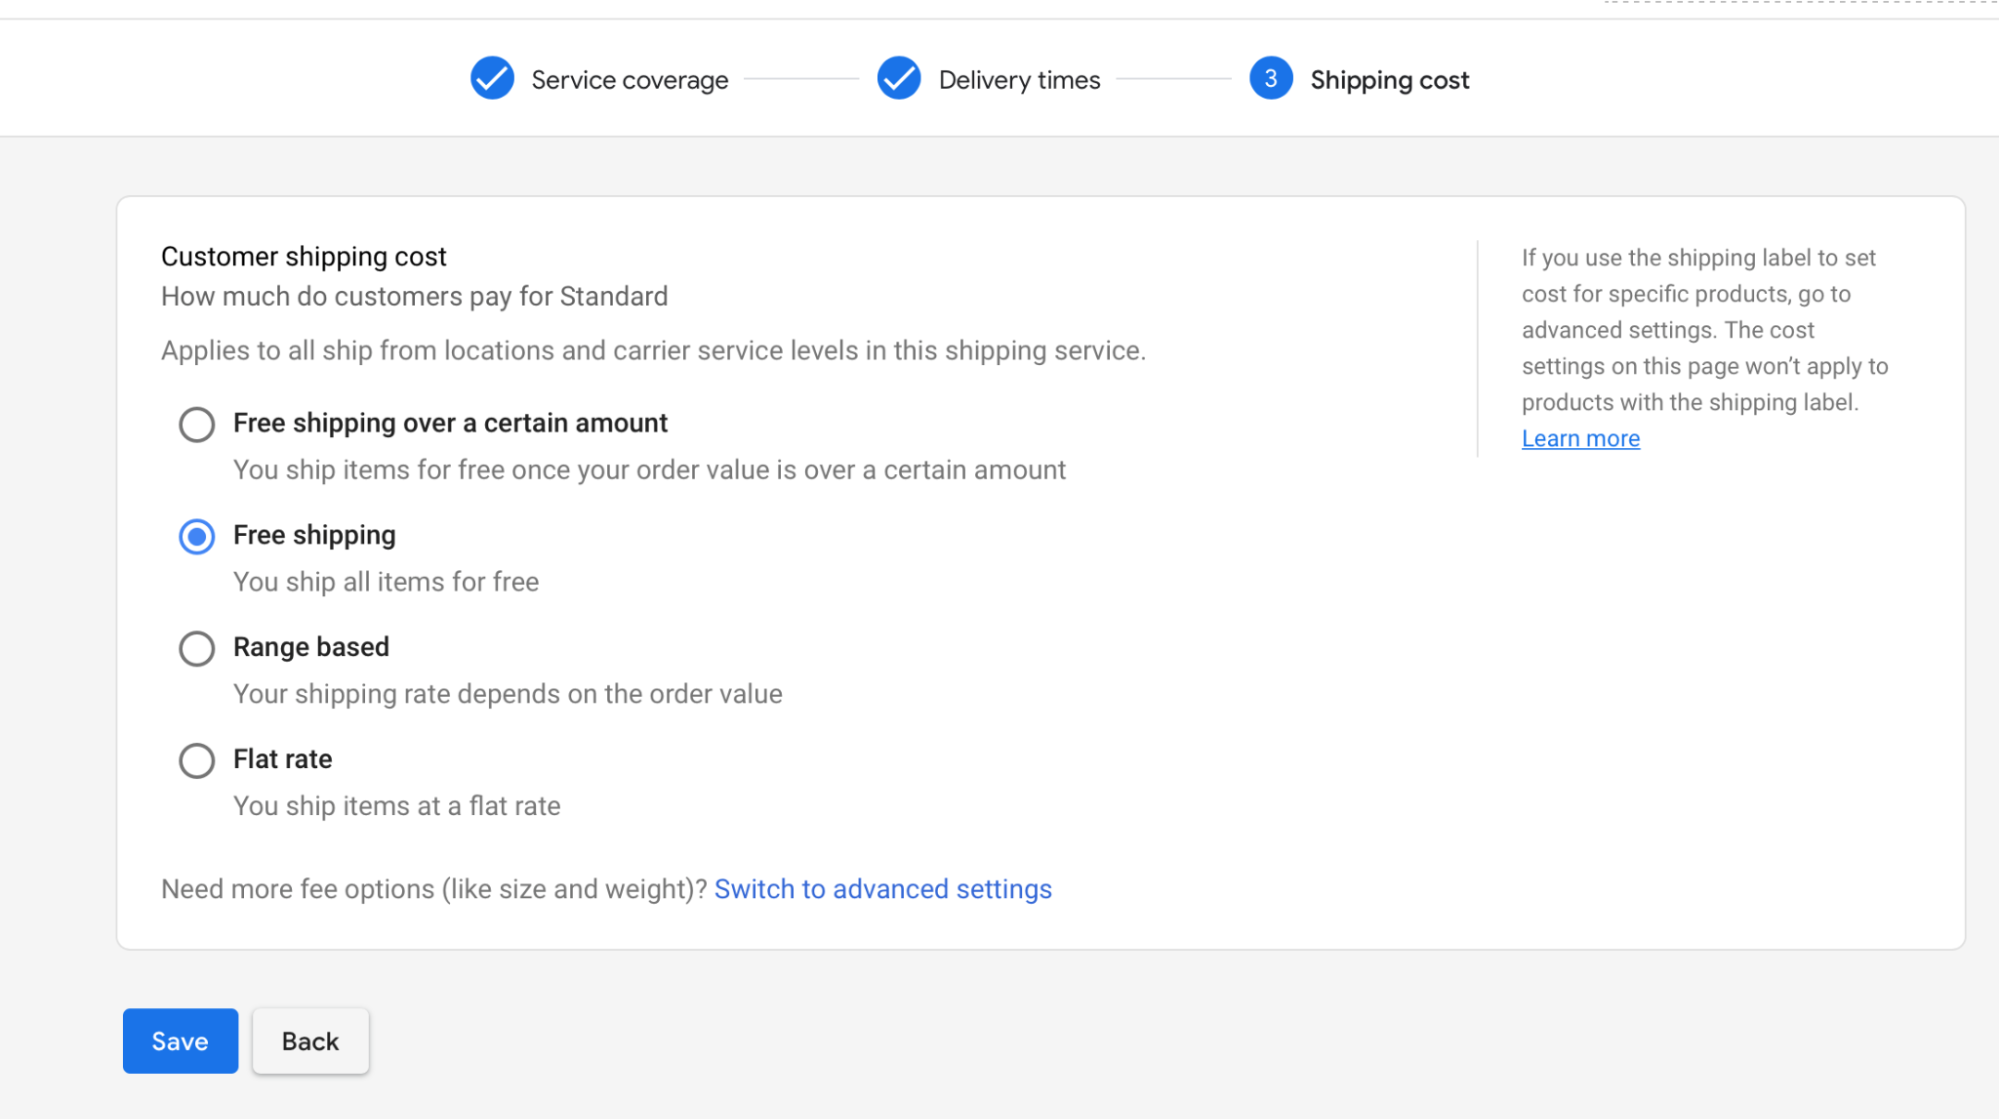
Set up Shipping
- Click on the gear icon, then click “Shipping and returns”.
- A dashboard will appear with the option to “Add shipping service.”
- Name the service and set the currency.
- Here you have multiple options for what shipping options you’ll provide and how much you’ll charge for shipping.
- Enter the location the products will be shipped; more than one can be added.
- Select the shipping service you offer.
- Pick how to charge for shipping from free shipping, free shipping over a certain amount, range-based, or flat-rate.
For more detailed steps, please read our below article:
>> Read more: What is Google Merchant Center? Setup guide for newbies
Link your Google Ads account to the Merchant Center
You must link your Google Ads account to advertise your goods through Google Shopping. Fill in your Google Merchant Center login information. There are three vertical dots in the upper right corner. After expanding the menu by clicking those, select “Account linking.”
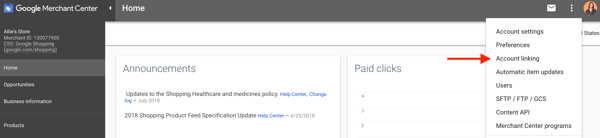
Next, enter your Google Ads customer ID by clicking “Connect account.” Your Ads account should be linked once you’re done.
Step 2: Set up a Google Shopping Campaign
Google Shopping campaigns help you advertise your products. Before clicking on your advertisement, customers can view detailed information about what you’re selling.
You can choose from two types of Shopping Campaigns: Standard Shopping campaigns and Performance Max campaigns. However, for those just starting, we suggest that you test out Standard campaigns before going further.
Standard Shopping Campaign
1. Set up Objective
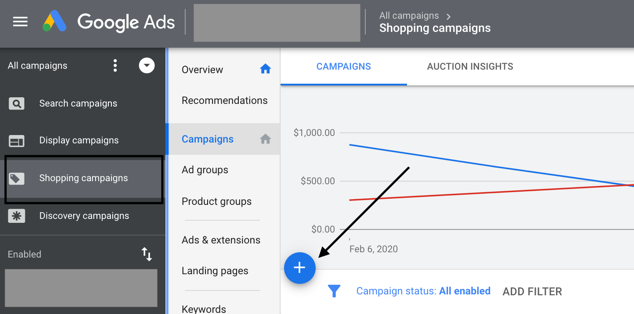
- To get started, log in to your Google Ads account.
- In the “Overview” on the left, click “Campaigns”. Then choose “New campaign”.
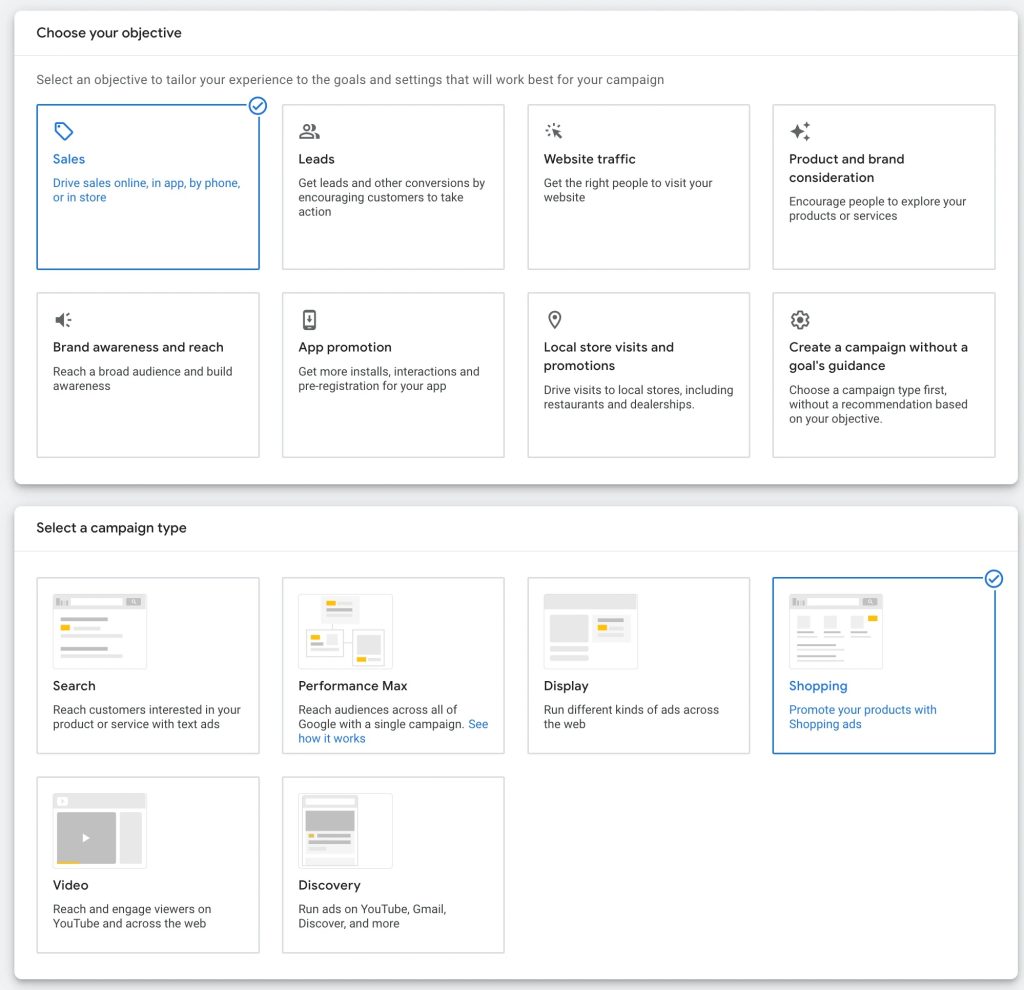
- Select the goal for your campaign, and click on “Sales”.
- Choose “Shopping” as your campaign type.
- Choose the Merchant Center account that has the products you want to advertise. If you can’t see any accounts, make sure your Merchant Center account is already linked to your Google Ads.
- Select the country where your products are sold. Confirm that it matches the country you specified in your product feed.
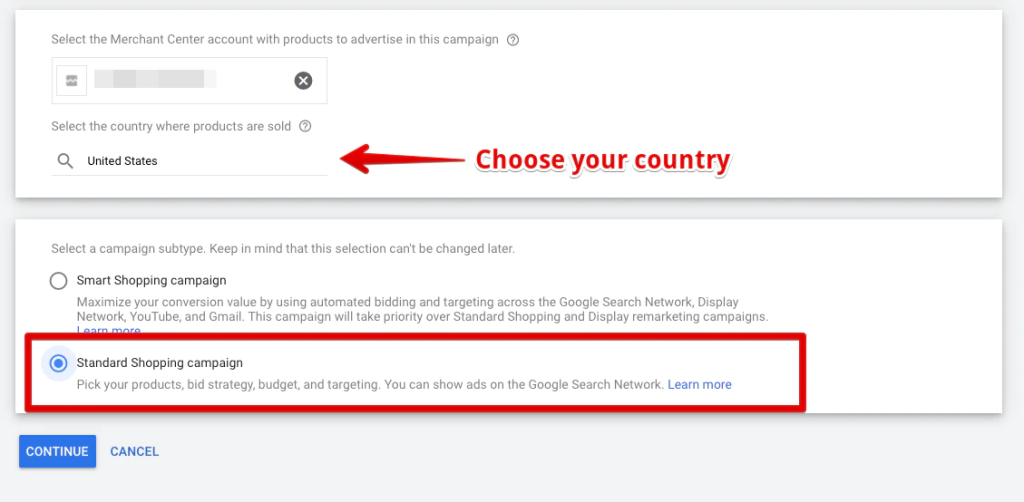
- Select your campaign subtype. Choose the “Standard Shopping” campaign.
2. Select Campaign settings
- Choose your advertising preferences: Give your campaign a name to make it easier to find later. You can set names based on the campaign’s characteristics or product features.
(Optional) In additional settings, click on the drop-down to edit these settings:
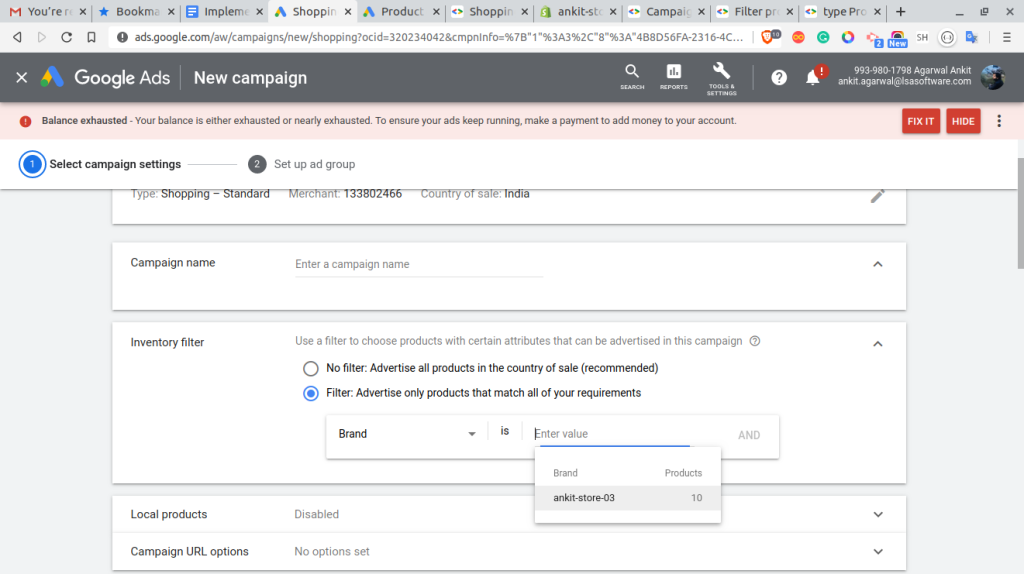
- Inventory filter: Only if you want to restrict the variety of products used in your advertising campaign.
- Local products: Allow advertisements for products sold in local businesses using Local inventory advertisements.
- Campaign URL options: A tracking template can be created, and a Final URL suffix can be added.
- Select your bid strategy:
There are three primary types of bidding you should focus on:
- Manual CPC: You set your own maximum cost-per-click for your ads. This gives you absolute control over how much you spend on individual product groups.
- Target ROAS: An automated bid strategy where Google uses AI to set bids based on the likelihood of a high-value conversion, aiming to achieve a specific return on your ad spend.
- Maximize Conversion Value: An automated bid strategy where Google uses AI to set bids to help you get the most revenue possible within your specified budget.
For beginners, we strongly advise you to choose Manual CPC. Because a brand new account lacks historical data, automated strategies can burn through your budget unpredictably. Start with Manual CPC to test the waters, and only transition to Target ROAS once your campaign has recorded 50 to 100 conversions.
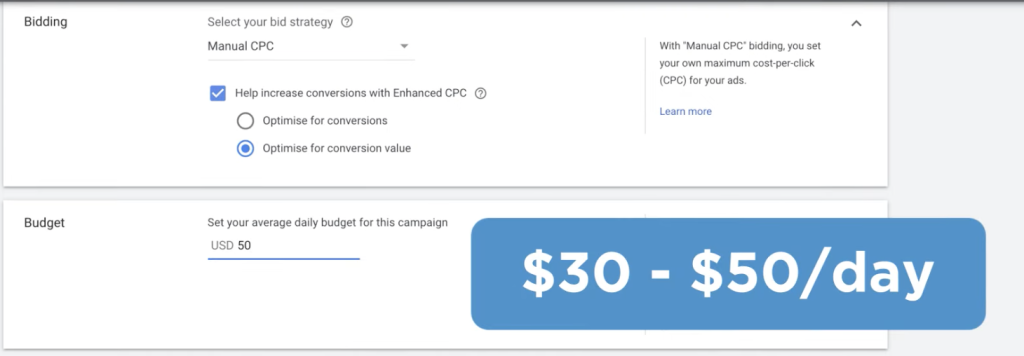
- Choose your daily budget: Select how much you’re willing to spend. In the beginning, test within 30 to 50 dollars per day.
- Select a campaign priority: Leave this at the default setting for your first campaign. Campaign priorities (Low, Medium, High) are advanced features used to funnel traffic when running multiple campaigns for the same products.
- Pick your networks and set up locations based on your shipping capabilities.
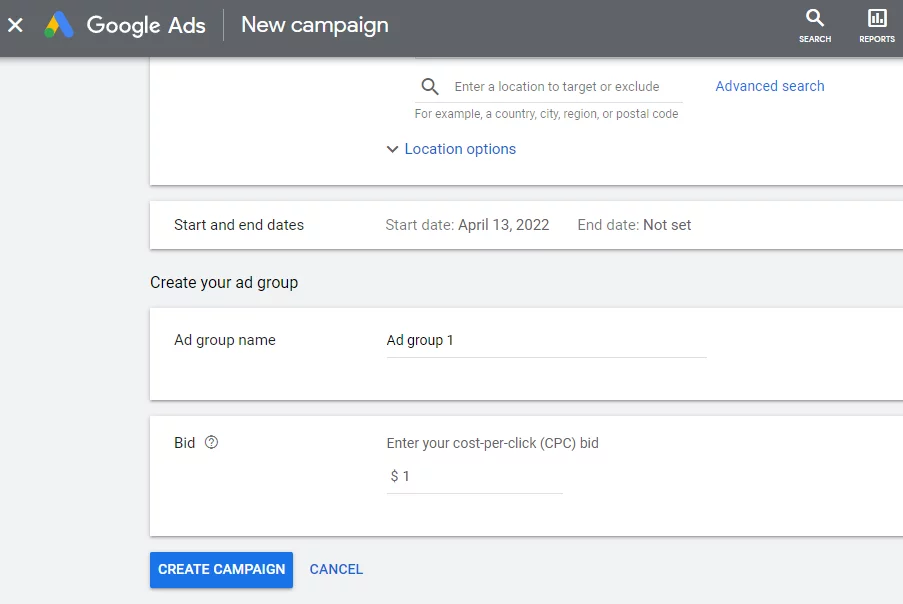
3. Select Google Shopping ad format
Set up an ad group name and enter your starting bid (e.g., $1.00). After you’ve created an ad group, you’ll place bids in it using product groups rather than keywords. You can segment these product groups by brand, category, or custom labels to adjust bids accurately based on performance.
→ Click on “Create campaign” and you are ready to go.
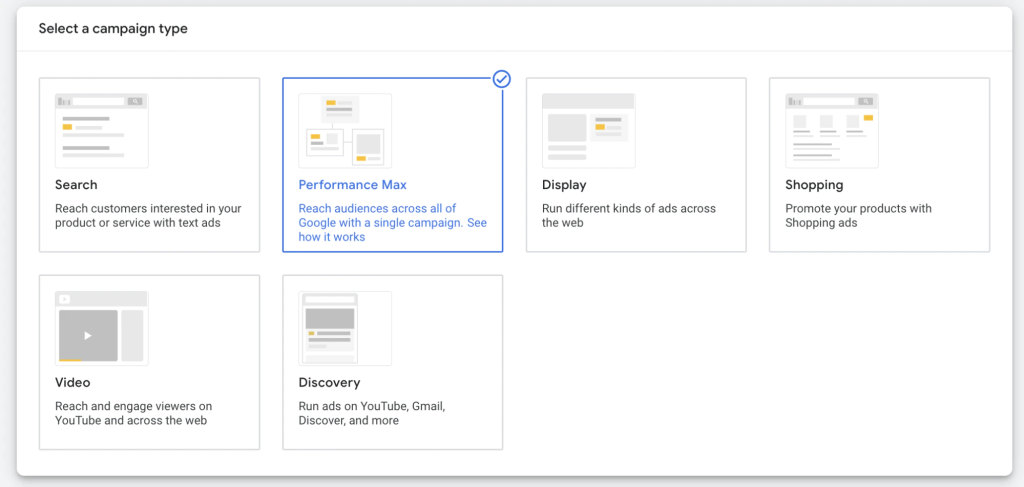
Performance Max Campaigns
The starting process is similar to creating a Standard Shopping Campaign. Select your objective, choose “Performance Max” as your campaign type, link your Merchant Center account, and name your campaign.
1. Set up Budget and Bidding
- Enter the daily average amount you wish to spend.
- Choose your bid strategy: Focus on Conversions (Target CPA) or Conversion Value (Target ROAS). We recommend using the “Maximize conversion values” approach for e-commerce.
2. Select Campaign Settings

Configure your locations and languages. Under “More Settings”, pay attention to the Final URL Expansion feature. We recommend turning this on, as Google’s AI will substitute your final URL with a more suitable landing page from your domain based on the consumer’s real-time search intent, massively boosting relevance.
3. Set up Asset Group
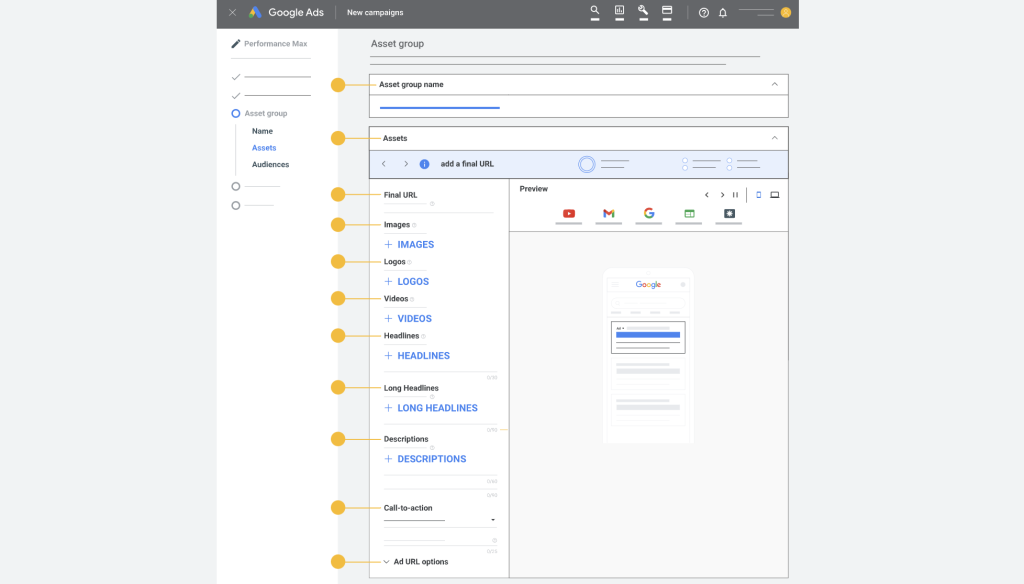
While Google automatically uses your Merchant Center feed, supplying extra assets (images, logos, videos, and headlines) allows your campaign to serve across all Google networks (YouTube, Gmail, Display, Discover).
- Enter a unique asset group name.
- Validate the campaign’s listing groups (decide which products to include or exclude).
- Add Audience Signals: This is crucial to steer Google’s machine learning in the right direction early on.
- Add extensions (sitelinks, callouts) to enlarge your ad’s real estate on the SERP.
Double-check your summary and click the Submit Campaign button.
How to optimize Google Shopping ads
Setting up the campaign is only the first step; continuous optimization is what truly drives profitable returns. Here are three practical tactics to scale your performance.
Add negative keywords using Search Terms Report
Unlike Search campaigns, Shopping ads don’t use manual keywords to trigger ads. However, you can still use negative keywords to prevent your products from showing up for irrelevant searches.
Make it a weekly habit to review the Search Terms Report. Look for informational queries (like “how to fix” or “what is”) or cheap competitor brand names that drain your budget without converting. Add these as exact or phrase match negative keywords to protect your ROI.
Create Product-themed Campaigns based on Profit Margins
Don’t lump all your inventory into a single campaign with the exact same ROAS target. Instead, create product-themed campaigns segmented by profit margins (e.g., High Margin, Low Margin, Best Sellers).
By utilizing “Custom Labels” in your product feed, you can separate these items. This allows you to assign a strict, high Target ROAS for low-margin items to ensure you don’t lose money, while bidding aggressively on high-margin products to capture maximum market share.
Implement a Two-Tier Shopping Structure
A two-tier shopping structure involves creating two identical Standard Shopping campaigns but assigning them different Campaign Priorities and bids.
For instance, set up a High Priority campaign with low bids and generic negative keywords to catch broad, top-of-funnel searches. Simultaneously, run a Low Priority campaign with significantly higher bids dedicated to catching specific, high-intent brand or product searches. This method perfectly funnels the right traffic to the most cost-effective bids.
Pro Tip: Product feed optimization is the foundation of successful Shopping Ads. Optimized product titles are the #1 lever for CTR improvement, accounting for up to 50–60% of total CTR impact. To maximize visibility, front-load key attributes using the proven formula: Brand + Product Type + Key Feature + Variant.
FAQs about Google Shopping Ads
To help you better navigate your advertising journey, we have compiled the most common questions regarding Google Shopping.
Search Ads are text-based and triggered by keywords. Shopping Ads are visual product ads that show images, prices, and product details from your Merchant Center feed.
The most common reason is a product or feed issue in Google Merchant Center, such as price mismatch, missing shipping details, policy violations, or disapproved products. Check the “Diagnostics” tab to find and fix errors.
Yes. You need a working e-commerce website with secure checkout, clear return/refund policies, accurate product information, and contact details that meet Google Merchant Center requirements.
Google Shopping Ads usually use a cost-per-click (CPC) model. You pay only when someone clicks your product ad, not when the ad is simply shown.
Final words
Learning about Google Shopping ads is vital if you have an online store. Mega Digital hopes this guide has guided you through displaying “rich” adverts at the top of the SERPS to attract more qualified leads to your business.
To make the best out of your Shopping ads, we suggest you use our Google Shopping Advertising service for better conversion rates.