
In today’s digital age, advertising has taken a significant leap forward with platforms like Microsoft Ads. Whether you’re a small business owner or a marketing professional, creating a Microsoft Ads account can help you reach a broader audience and boost your online presence. This article will guide you through the process of setting up your Microsoft Ads account and provide tips on how to optimize it for better results.
Before setting up a Microsoft Ads account
Before setting up a Bing advertising account, you need to prepare the following:
- Email Address: You need an existing email address or you can create a new email address (a Microsoft account) to sign up for Microsoft Advertising.
- Business Details: You should have a few details about your business ready.
- Currency: Be mindful in selecting your currency as it can impact your billing choices. Once an account is created, it is not possible to modify the chosen currency.
- Language: The language you select will affect the language that you see when you sign in to Microsoft Advertising and the emails that you receive from Microsoft Advertising. It doesn’t impact your ad language.
- Time Zone: This is the default time zone for your campaigns, and so it is recommended that you use your local time zone. Billing is not influenced by the selected time zone.
Once you’ve prepared these, you can follow the steps to create your Microsoft Ads account.
How to create a Microsoft Bing Ads account
Step 1: Go to Microsoft Advertising sign-up
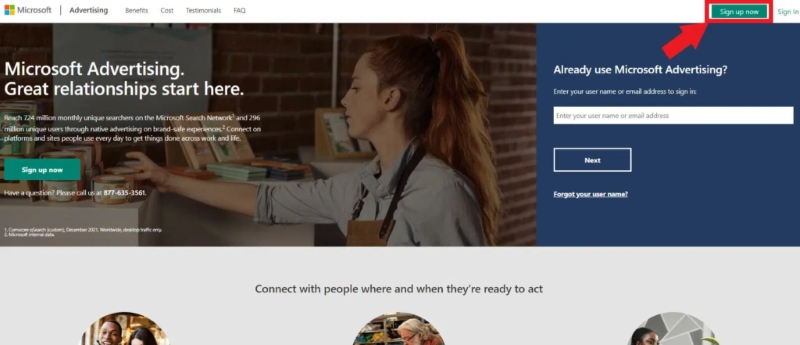
You can do this at any time by visiting the Microsoft Advertising sign-up page.
Step 2: Decide how you want to sign in
When signing up for Microsoft Advertising, you’ll encounter two choices:
- Use an existing email address to create an account.
- Create a new email address and then create an account.
Option #1: Create an account with your existing email
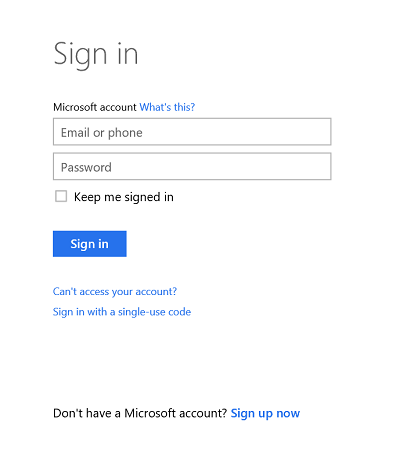
- Visit the Microsoft Advertising sign-up page and input an existing email address, whether it’s from work, school, or a personal email service like Outlook, Gmail, or Yahoo. If you already use this email for Microsoft products like Skype or Xbox LIVE, signing in will seamlessly complete the transition.
- Opt to stay signed in.
- Fulfill any additional verification requests and select Next.
- If prompted, use the Microsoft Authenticator App for added security.
- Choose “Create new account”.
- Specify the language for advertising and select Next.
- Enter your business website (or create a landing page if you don’t have one) and select Next.
- Opt for either Streamlined, simple experience or Take full control.
- If Streamlined is chosen, select your ad channels; if Take full control, proceed to the next step.
- Input your ad information and select Next.
- Choose your target audience, location, and keyword themes, then select Next.
- Provide budget details and select Next.
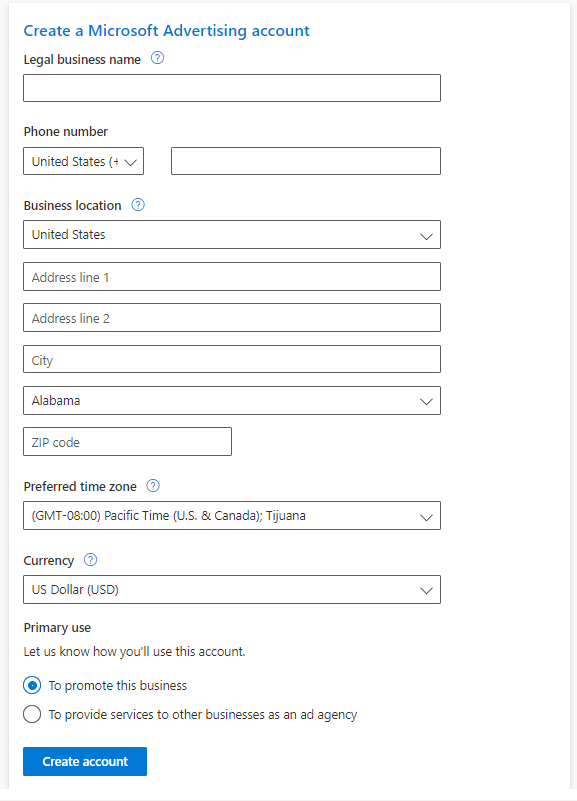
- Enter your Legal business name, Phone number, Business location, Preferred time zone, and select Next.
- Optionally, enter a Promotional offer, select your Billing country/region, choose a payment setting and method.
- Review the Microsoft Advertising Terms and Conditions, check the box if you agree, and select Submit and go live.
Option #2: Make a new email and create an account
- Visit the Microsoft Advertising sign-up page and click on “Sign up now”.
- In the subsequent window, next to “No account?”, opt for “Create one!”.
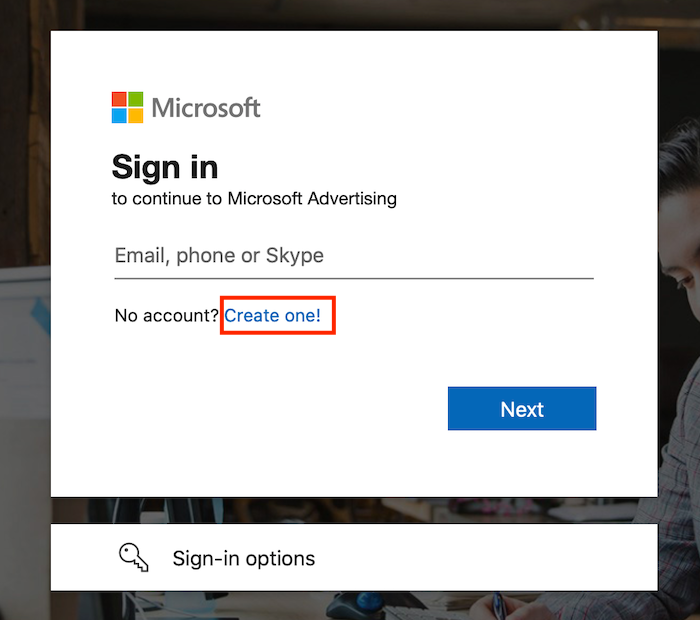
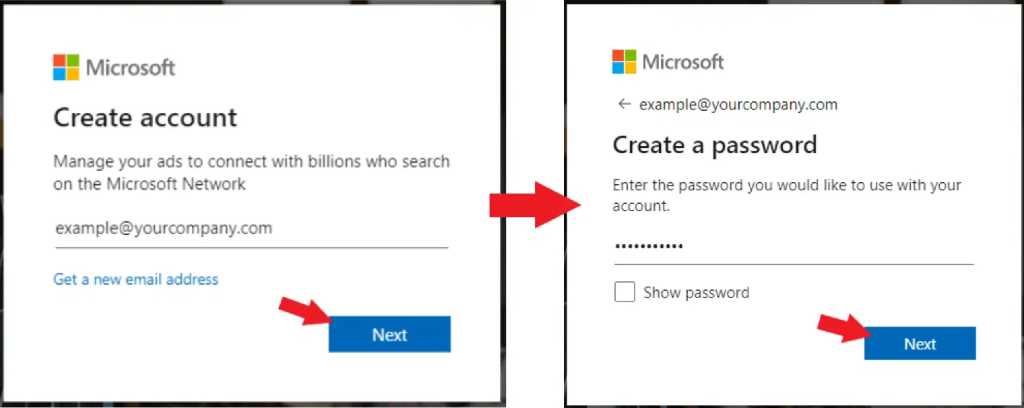
- Choose “Get a new email address”, enter an email to establish an Outlook account, and then click “Next”. If the chosen address is unavailable, select an alternative name and retry.
- Create a password, click “Next”.
- Input your First and Last name, and proceed by clicking “Next”.
- Upon submitting, an email confirmation containing a code will be sent; copy and paste the code in the platform and click “Next”.
- Navigate through a security check with a captcha by clicking “Next”.
- Choose to “Stay signed in”.
- After potential verification requests, click “Next”.
- If prompted, use the Microsoft Authenticator App for added security.
- Specify your advertising goal.
- Provide your business name and website, and click “Next”.
- Choose your advertising placement and click “Next”.
- Establish keyword themes and click “Next”.
- Develop your ad and click “Next”.
- Input your business phone number and click “Next”.
- Set your budget + click “Next”.
- Provide Legal business name, Phone number, Business location, and Preferred time zone, then click “Next”.
- Enter any optional promotional offer, select your Billing country/region, and choose a payment setting and method.
- Carefully review and accept the Microsoft Advertising Terms and Conditions.
- Finally, click “Submit and go live”.
Step 3: Link your account to a Microsoft Ads manager account (optional)
If you wish to manage a client’s or a third party’s campaigns through your Bing Ads account, you have the option to do so, but it requires obtaining permission from the account owner. Here’s the process:
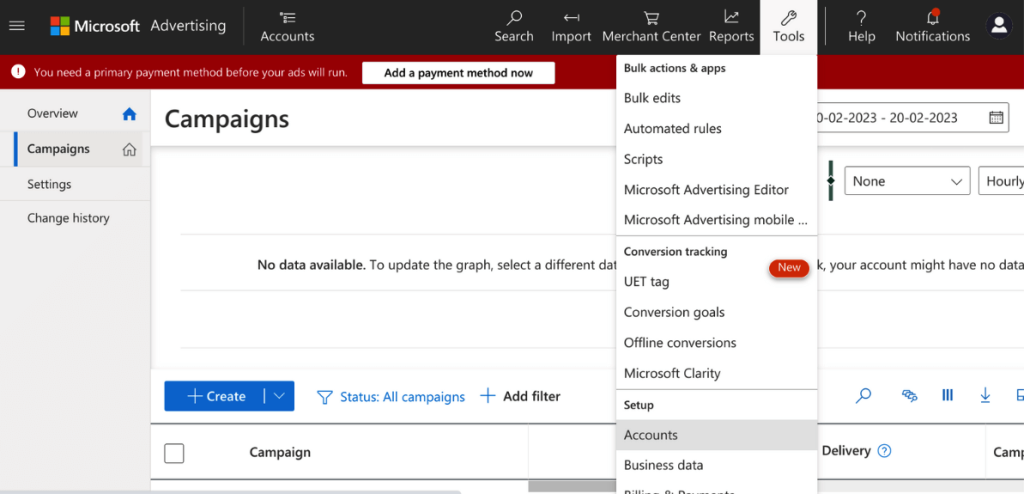
- Navigate to the top menu and choose ‘Tools’ > ‘Accounts’.
- Select ‘Accounts Summary’ and then go to ‘Requests’.
- Click on ‘Link to Account’.
- In the Linking details section, input the Account number, which consists of an 8-digit combination of numbers and letters.
- Specify the account start date, indicating when you intend to commence managing the account. It’s important to note that even if the date coincides with the linking day, you cannot proceed until permission is granted.
- Optionally, add a ‘Note’ to serve as a brief and helpful memo for communication with the account owner.
- Click ‘Send Request’ if you do not plan to take over billing responsibilities. Alternatively, if you do intend to handle billing, choose ‘I will take over billing for this account’, input your payment details in the provided section, and then click ‘Send Request’.
>>> Read more: Microsoft (Bing) Ads Manager Account: How to Create One
Indeed, setting up a Microsoft Ads account can seem like a daunting task with numerous steps to follow. If you’re someone who prefers to save time and avoid the intricacies of setting up an account, you might want to consider opting for an agency ad account. Not only does this option relieve you of the setup process, but agency ad accounts also come with added benefits that a personal ad account may not offer.
Differences between personal & agency Microsoft Ads account
A personal Microsoft Ads account and an agency Microsoft Bing Ads account, have different functionalities and are used for different purposes.
| Feature | Personal Microsoft Ads Account | Agency Microsoft Ads Account |
|---|---|---|
| Account Type | Individual user | Advertising agency or team |
| Access Permissions | Single user access | Multiple user access |
| Management Scope | Manages personal campaigns | Manages campaigns for clients |
| Billing Control | Personal billing details | May handle client billing |
| Client Accounts | N/A | Manages multiple clients |
| Permission Requests | N/A | Can request access to client accounts |
| View and Edit Access | Limited to the account owner | Can assign various levels of access to team members |
| Billing Responsibility | Solely responsible | Can be responsible for client billing |
| Reporting and Analytics | Limited to personal campaigns | Access to data from multiple client campaigns |
| Campaign Collaboration | Limited collaboration options | Improved collaboration features for team members. |
| Ownership Transfer | N/A | Can transfer account ownership for client accounts |
The choice between a personal and agency account depends on your specific needs and circumstances. If you want full control over your campaigns and are willing to manage them yourself, a personal account would be more suitable. On the other hand, if you prefer to have a professional agency manage your campaigns, an agency account would be the better choice.
How to invite users to access your Microsoft Ads account
Only a Super Admin and a Standard User have the capability to invite additional individuals to collaborate on campaigns. To facilitate this process, follow this step-by-step guide for providing access Microsoft Ads.
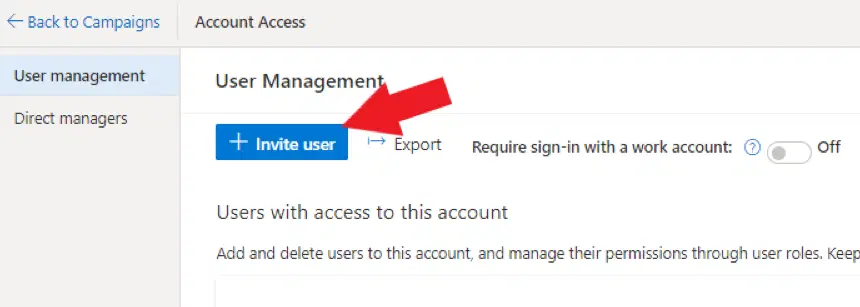
- Log in to your account, choose “Tools” on the homepage, and scroll down to “Account Access”.
- Click on “Invite user” located on the User Management page.
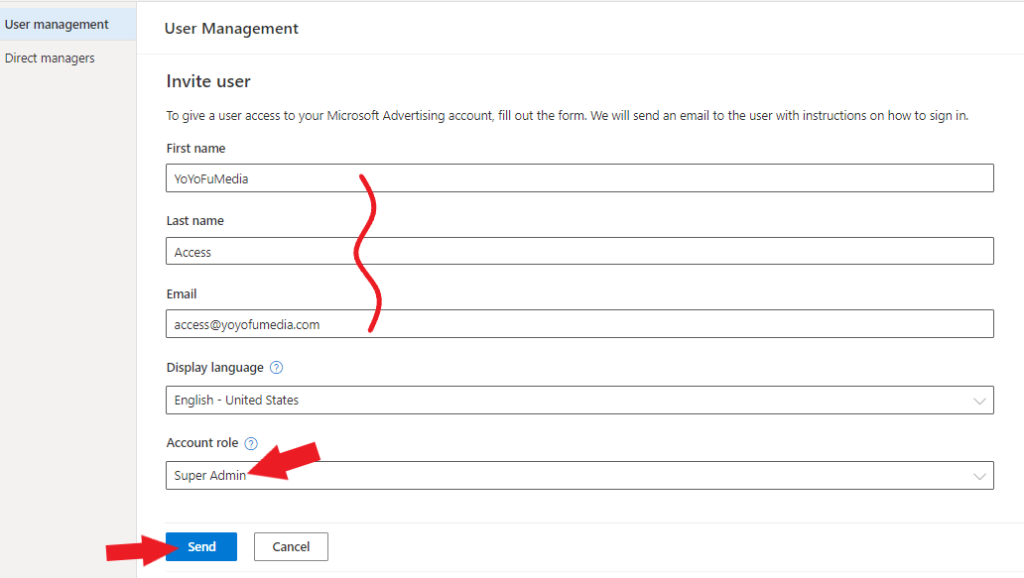
- Input their details and indicate the account role to which they will have access.
- Click “Send”, and Microsoft will dispatch a helpful, instructional email to the user.
How to share administrative access with an agency
Step 1: Navigate to the tools section on your Microsoft Ads dashboard and select “Account access”.
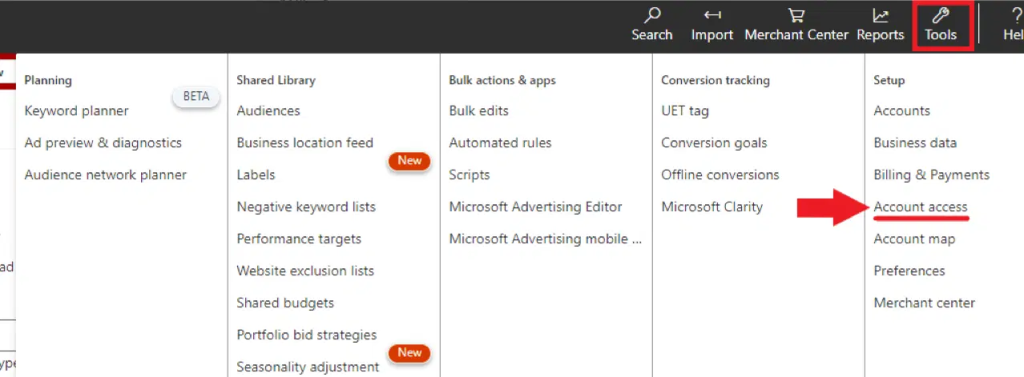
Step 2: Within the user management tab, click on the “+ Invite user” option.
Step 3: Enter the details provided by the marketing agency to grant access to your account. For the account role, it’s your choice, but we recommend selecting Admin or “Super Admin” for comprehensive permissions.
Step 4: Check for the pending invitation in the “Users with access to this account” section. Inform your agency that you have sent the access invitation to your Bing Ads account.
How to obtain permission to access a client’s Microsoft Ads Account
If you’re operating as an agency, it is more advantageous to establish a formal connection in Microsoft Advertising rather than being included as a new user. This allows you to directly link to your client’s Microsoft Ads account, creating a more streamlined working relationship for both you and your client.
To initiate this process, ensure that both you and your client have registered for Microsoft Advertising accounts. Request your client to provide their Microsoft Advertising account number, as it will be necessary when seeking access.
Follow these steps to request permission to manage your client’s account:
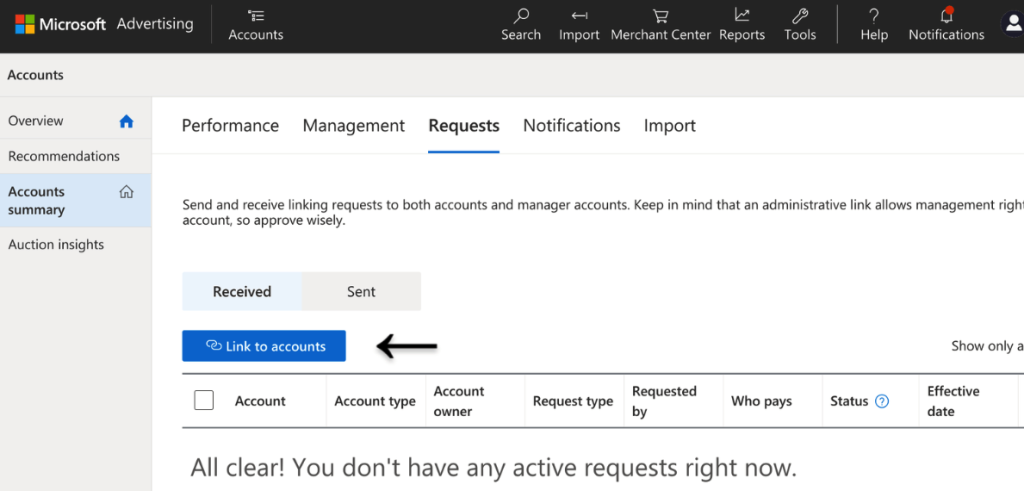
Step 1: In the upper-right menu, choose “Tools” and navigate to “Accounts”.
Step 2: Opt for “Account summary” in the menu on the left-hand side, and select “Requests”.
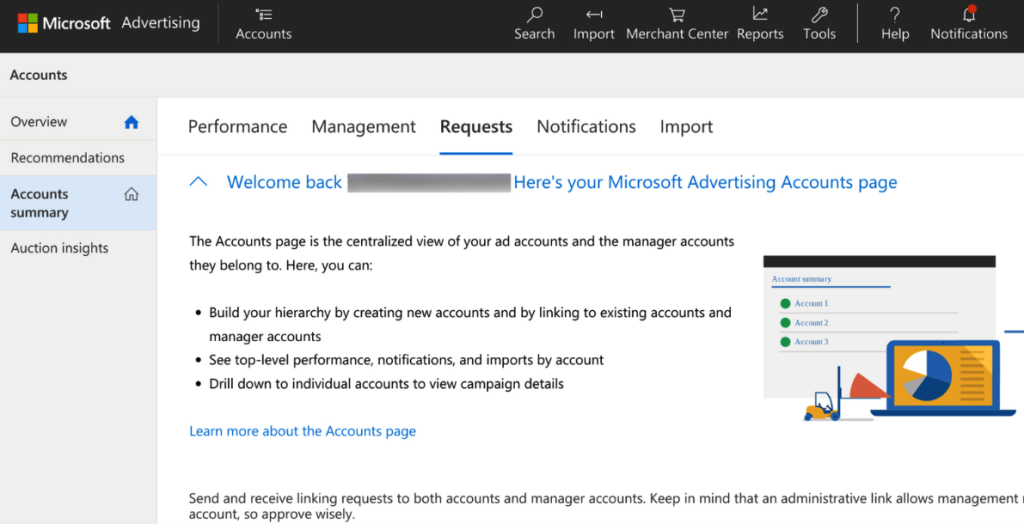
Step 3: Click on “Link to accounts”.
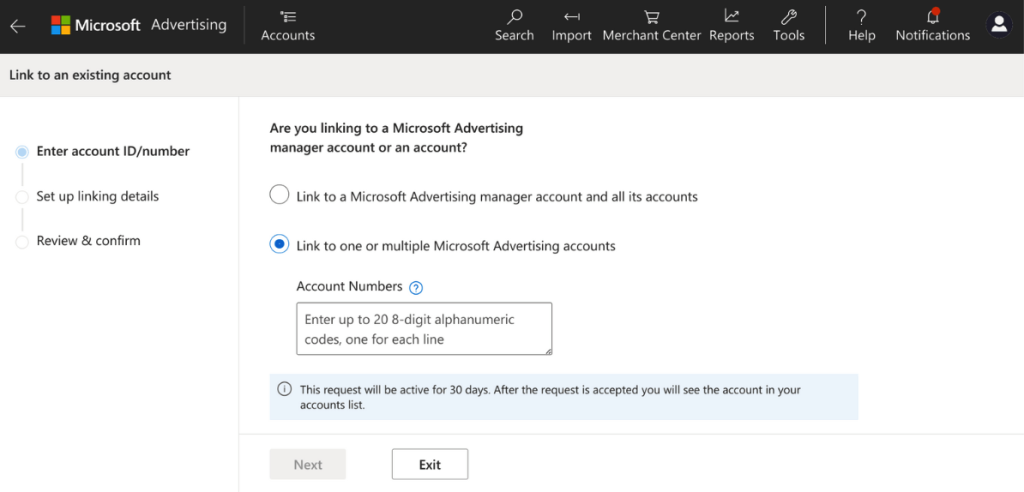
Step 4: Input your client’s Microsoft Ads account number, consisting of an 8-digit combination of numbers and letters. Click “Next” at the bottom to proceed.
Step 5: Set a “Start date” for managing the account. If you choose “Immediately,” you’ll commence managing the account once your client approves your request. Feel free to include a note if needed.
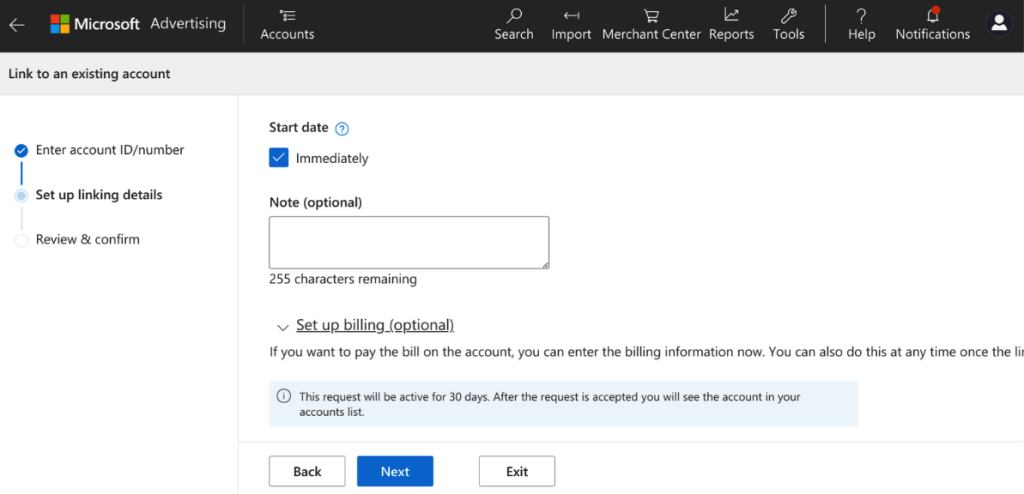
Step 6: If you intend to handle billing for the account, furnish payment details in the remaining section before clicking “Send request”. It’s important to note that assuming billing responsibilities means you’ll be accountable for any outstanding charges on the account once your request is accepted. You have the flexibility to take over billing at any later point.
Wrap up
A Microsoft Ads account is powerful for any business looking to expand their online presence. Remember, while the setup process may seem lengthy, the potential benefits in terms of reach and conversion can be substantial. If managing the process feels overwhelming, opting for an agency account is a practical choice. It provides expert management and extra advantages. Regardless of your choice, integrating Microsoft Ads into your digital marketing toolkit is a valuable decision.